Discover essential tips for selecting materials, planning, installing, and maintaining your paver walkway to enhance both durability and aesthetic appeal.Creating a stunning paver walkway not only enhances the curb appeal of your home but also provides a functional path through your outdoor space. Whether you’re a seasoned DIY enthusiast or a beginner looking to add a personal touch to your landscape, this guide offers essential tips and tricks for successful paver walkway installation. From choosing the right materials to planning your layout for optimal flow, we’ll cover everything you need to know to transform your outdoor area into a beautiful and inviting environment. Plus, we’ll highlight common pitfalls to avoid and provide maintenance advice to ensure your paver walkway remains both durable and aesthetically pleasing for years to come. Dive into this comprehensive guide and get ready to elevate your outdoor design!
Choosing The Right Materials For Your Paver Walkway
When it comes to installing a paver walkway, the choice of materials is crucial to ensuring durability, aesthetic appeal, and ease of maintenance. Here are some key factors and options to consider:
1. Types of Pavers
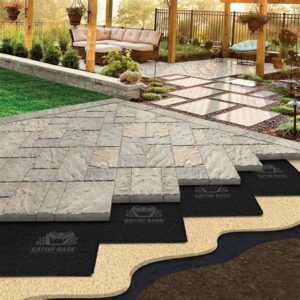
There are several types of pavers available on the market. Here are the most common:
- Concrete Pavers: Affordable and versatile, concrete pavers come in various colors and sizes. They are durable and ideal for high-traffic areas.
- Brick Pavers: These provide a classic look and are exceptionally strong. They are great for enhancing curb appeal but can be more expensive than concrete.
- Natural Stone Pavers: Options like granite, slate, and limestone offer a unique aesthetic. They can be pricey but add significant value and beauty to your landscape.
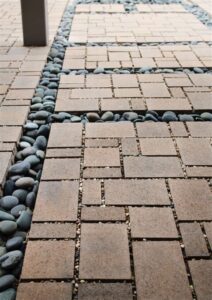
- Permeable Pavers: Ideal for eco-friendly landscaping, these pavers allow water to pass through and reduce runoff, making them a good choice for environmentally conscious homeowners.
2. Color and Texture
Choosing the right color and texture can significantly influence your paver walkway’s appearance. Consider the overall design of your home and landscape. Cohesive color schemes enhance the walkway without overwhelming its surroundings. Textured pavers can also improve grip, making them safer in wet conditions.
3. Base Materials
In addition to pavers, the base material is essential for a stable walkway. Common options include:
- Granular Base: Crushed stone or gravel provides excellent drainage and support.
- Sand Base: Using a sand layer can help in leveling and securing pavers, but it may require more frequent maintenance to keep weeds at bay.
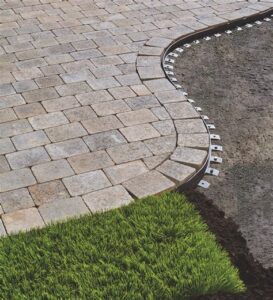
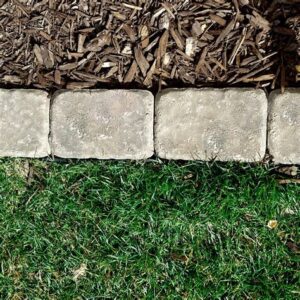
4. Edge Restraints
To maintain the structure of your paver walkway, it’s vital to use edge restraints. These can be made from plastic, metal, or concrete and help keep the pavers from shifting over time.
5. Accessories
Finally, consider the additional elements that can enhance your paver walkway:
- Lighting: Integrated or standalone lighting can highlight your walkway and improve safety during nighttime use.
- Sand Polymeric Joint Fillers: These help lock pavers in place and prevent weed growth, reducing maintenance in the long run.
In summary, selecting the right materials for your paver walkway involves careful consideration of type, color, texture, base materials, edge restraints, and additional features. Making informed choices will ensure that your paver walkway is both functional and visually appealing.
Planning Your Paver Walkway Layout For Optimal Flow
When planning the layout of your paver walkway, it’s essential to consider not just aesthetics but also functionality and flow. A well-designed paver walkway should guide visitors smoothly from one area to another while enhancing your landscape.
Here are some key tips to achieve optimal flow with your paver walkway:
By thoughtfully planning your paver walkway layout, you can create an inviting and functional path that adds value to your outdoor space while encouraging seamless movement throughout your landscape.
Step-By-Step Guide For Paver Walkway Installation
Installing a paver walkway can enhance your home’s curb appeal while providing a functional path through your garden or yard. Here’s a detailed step-by-step guide to help you with your paver walkway installation:
- Preparation:
Start by marking the area where you want to install your paver walkway. Use stakes and string or spray paint to outline the pathway’s shape. Ensure to consider the size and pace you desire for the walkway.
- Excavation:
Remove the grass, soil, and debris to a depth of 4-6 inches (or more, depending on your paver thickness). Maintain a slight slope away from foundations and buildings for proper drainage.
- Add Base Material:
Fill the excavated area with a layer of crushed stone or gravel. This base layer should be roughly 3-4 inches thick. After adding, compact it using a plate compactor to ensure stability.
- Install Edge Restraints:
To keep your pavers in place, install edge restraints (plastic, metal, or concrete) along the perimeter of your walkway. This helps prevent paver movement over time.
- Sand Layer:
Spread a 1-inch layer of sand over the compacted base. Use a screed board to level the sand, ensuring it is smooth and uniform for paver placement.
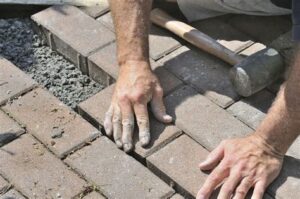
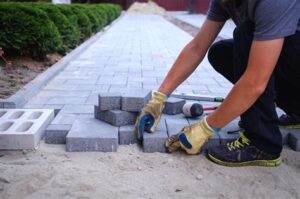
- Lay the Pavers:
Begin laying the pavers from one end of the walkway. Lay them in your desired pattern, leaving a small gap between each paver (approximately 1/8 inch). Tap each paver into place gently with a rubber mallet for even and secure positioning.
- Fill Joints:
Once all pavers are laid, spread polymeric sand over the surface and brush it into the joints between the pavers. This will help lock the pavers in place and prevent weed growth.
- Compact Again:
Use the plate compactor again over the entire walkway to ensure that the pavers settle into the sand, enhancing stability and durability.
- Final Cleanup:
Remove excess sand from the surface with a broom. Be careful not to disturb the sand in the joints. You can also rinse the walkway lightly with water to help settle the sand.
- Sealing (Optional):
Consider applying a sealant to your paver walkway to protect it from the elements and enhance its appearance. Follow the manufacturer’s instructions for application.
By following these steps, your paver walkway will be a beautiful and functional addition to your home. Remember to take your time, and enjoy the process as you create a stylish pathway!
Common Mistakes To Avoid During Paver Walkway Construction
When constructing a paver walkway, avoiding common mistakes can save you time, effort, and money. Here are some key pitfalls to look out for:
1. Inadequate Base Preparation
One of the most critical steps in paver walkway installation is preparing the base. Skipping or improperly executing this step can lead to settling, shifting, or cracking over time. Ensure you compact the soil and add a suitable base material like crushed stone for stability.
2. Lack of Proper Drainage
Water pooling on your walkway can lead to extensive damage. Ensure that your walkway has appropriate drainage solutions in place. A slight slope can help direct water away and decrease the likelihood of erosion.
3. Not Using Edging
Failing to install proper edging can cause your paver walkway to spread or shift over time. Use sturdy materials, such as plastic or metal edging, to maintain the walkway’s integrity and appearance.
4. Wrong Paver Placement
Ensure your pavers are level and aligned correctly. Misalignment can make your walkway look unprofessional and may lead to safety hazards. Take the time to dry-fit the pavers before permanently placing them.
5. Ignoring the Expansion Joints
Expansion joints are vital in accommodating the natural movement of materials due to temperature fluctuations. Omitting these can lead to stress fractures or shifting.
6. Choosing Poor Quality Materials
Opting for low-quality pavers can be a costly mistake in the long run. Invest in durable, weather-resistant pavers that suit your climate and provide long-lasting aesthetics.
7. Neglecting Maintenance Planning
Many homeowners overlook the maintenance aspect when constructing a paver walkway. Plan for regular cleaning, joint filling, and sealing to prolong the life and appearance of your walkway.
8. DIY vs. Hiring Professionals
While DIY projects can be rewarding, misjudging your skill level can lead to mistakes. Don’t hesitate to consult a professional if you’re unsure about any step in the process, particularly for design or drainage considerations.
9. Rushing the Process
Taking your time during installation can result in a more aesthetically pleasing and durable walkway. Avoid rushing through any steps, from planning to execution.
10. Not Considering Foot Traffic
A common oversight is failing to account for daily foot traffic when designing your walkway. Consider the width and thickness needed for high-traffic areas to avoid wear and tear prematurely.
By keeping these common mistakes in mind, you can ensure that your paver walkway is not only beautiful but also functional and enduring.
Maintaining Your Paver Walkway For Longevity And Aesthetic Appeal
To ensure your paver walkway remains both functional and visually appealing, regular maintenance is essential. A well-maintained paver walkway not only enhances the aesthetic of your landscape but also prolongs its lifespan.
Here are some important maintenance tips to consider:
By following these maintenance tips, you can preserve the beauty and functionality of your paver walkway, ensuring it remains a stunning feature of your landscape for years to come.
Frequently Asked Questions
What tools do I need for paver walkway installation?
For installing a paver walkway, you’ll typically need a shovel, a rake, a level, a rubber mallet, a compacting machine, and a saw for cutting pavers.
What are the steps involved in preparing the area for a paver walkway?
Start by marking the walkway’s layout, then remove any grass or debris, dig down to create a solid base, and install landscape fabric to prevent weed growth.
How thick should the base material be for a paver walkway?
The base material should generally be about 4 to 6 inches thick to provide adequate support for the pavers.
Can I install a paver walkway without a professional?
Yes, many homeowners choose to install paver walkways as a DIY project, provided they follow the proper guidelines and techniques.
What type of pavers should I use for a walkway?
Common choices for paver walkways include concrete pavers, brick pavers, and natural stone, each offering different aesthetics and durability.
How do I ensure my paver walkway is level?
Use a long level or a screed board to check that the surface is even while installing, and adjust individual pavers by tapping them with a rubber mallet.
What maintenance does a paver walkway require?
Regular maintenance includes sweeping debris, washing the surface, replacing any damaged pavers, and applying a sealant every couple of years for protection.